


How To Adjust the Clutch Cable on a Motorcycle

It goes by many names: Clutch free play, clutch slack, or clutch tension describes the amount of free movement your motorcycle’s clutch lever has before it begins pulling on the clutch cable itself. Why does that matter? The clutch installed on your bike is a wear item, and as the friction plates within the clutch wear out from countless engagements and disengagements, they become thinner. That means we must adjust things and ensure they are within specification. It’s a simple routine maintenance task for every motorcycle equipped with a cable-actuated clutch. When things get out of whack, it can lead to everything from minor shifting difficulties to costly damage to the clutch and transmission. In this installment of helpful content, we’ll teach you how to adjust the clutch cable on your motorcycle.

You’ll need to adjust your clutch more or less often depending on the type of riding you’re regularly doing. A roadracer like our very own Troy Siahaan, who launches his bike during race starts will abuse a clutch much more than your average touring rider. Likewise, what Ryan Adams does during long-distance off-road rides, constantly slipping the clutch in technical terrain and popping the front wheel over obstacles, can be especially rough on equipment. The point is all cable-actuated clutches need to be checked periodically, regardless of your riding style.
Measuring Clutch Free Play
Adjusting your cable clutch is relatively simple, and, in most cases, it can be done with a few quick turns of the barrel adjuster found on the clutch perch before leaving the garage. Remember, all we want to achieve is a little free play in the lever before the cable is pulled taut. Here’s what you’ll need:
- Clutch free play specification listed in your motorcycle owner’s manual
- A reliable measuring tool (ruler, calipers, or tape measure)
- A basic set of hand tools
There are two prevailing methods for measuring clutch free play.

The first is a method cited by many motorcycle manufacturers, which measures the distance between the end of the clutch lever itself and the motorcycle grip, calling for a free-play range typically between 10mm to 20mm (again, refer to your owner’s manual). While easy to perform, it is a potentially flawed method because it assumes the motorcycle is equipped with a stock clutch lever. Aftermarket levers can vary in shape and size, altering that measurement significantly. Another consideration is that the stock lever could be bent or damaged in a minor tip-over, making the manufacturer-cited range challenging to interpret. If you have pristine stock levers, then it should be fine.
The second, and far more accurate, method measures the gap between the lever and the clutch perch. Measuring here provides two flat surfaces that remain constant whether you’re working with a stock, aftermarket, or damaged lever. Generally, manufacturers will cite 3mm to 5mm of free play when measured here.
Adjusting Clutch Cable Free Play
You’ve checked your measurements, and they are outside the recommended specification. What next? There are two primary ways to adjust clutch free play, AKA slack, on most cable-actuated motorcycles, starting with the barrel adjuster on the clutch perch. Let’s reserve this adjuster for more minor changes.

First, loosen the locknut on the barrel adjuster, which can typically be done by hand. Use a light grip with some pliers if the locknut is firmly secured. Once that’s loosened, you can spin the barrel adjuster freely – tightening it (turning clockwise) will increase slack on the cable and reduce tension, adding free play. Meanwhile, loosening the barrel adjuster (turning counterclockwise) will decrease slack and reduce free play.
Remeasure the gap between the lever and perch (or lever and grip) after adjusting. Once you’ve met your bike’s specifications, tighten the locknut against the perch. Be sure to note the groove location of both the locknut and barrel adjuster; make sure they aren’t lined up; otherwise, the cable can pop out. Try to aim the barrel adjuster’s groove toward the bike so that road grime doesn’t collect in the cable.

In some circumstances, you might not be able to achieve the correct slack measurement with the barrel adjuster alone. If that’s the case, you’ll want to look to the lower adjuster located at the opposite end of the clutch cable, usually near where the cable connects to the clutch arm push rod.
Since this adjuster allows for more significant changes in clutch slack, you’ll want to screw the barrel adjuster on the clutch perch nearly all the way in so that you can have more wiggle room as the clutch wears.

The adjustment process is essentially the same as what’s available to us on the clutch perch, though we’ll usually be using open-ended wrenches to loosen the lock nuts. Spinning the backing nuts or adjuster clockwise will increase slack on the cable, while spinning the backing nuts or adjuster counterclockwise will decrease slack. Now that you’re in a better range, cinch the bolts back up, and you can use the barrel adjuster on the clutch perch for fine-tuning.
Lube and Routine Maintenance
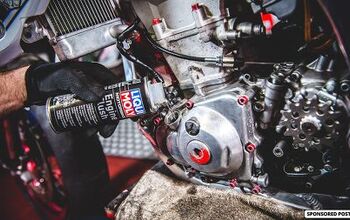
If you haven’t noticed, MO is a well-oiled machine that delivers informative content regularly. Much like this beautiful publication, every manufacturer knows that many components on their motorcycles must be lubricated to function for the end user: You. That also extends to our clutch lever, which can start feeling notchy or rough when there is a distinct lack of lubrication on its moving parts.
Consult your owner’s manual for specific service intervals, but if you’re adjusting your clutch slack, it isn’t a bad habit to pull the clutch lever off to clean the pivot bolt and perch. Once all the old grease and road grime are removed, it’s time to lather the pivot bolt in a high-quality waterproof grease to ensure fluid movement.

Your clutch cable needs to be lubricated as well. Otherwise, the clutch pull will feel harsh and may not return to its intended position due to excessive resistance within the cable housing. There are a handful of ways to get this job done. The most thorough way to do it is to pull the clutch cable off the bike and use a cable lube tool to spray lubricants inside the housing. However, you can sometimes use the straw that comes with the spray lubricant and get it inside the cable housing—either way; it is incredibly messy, so keep several rags handy. Alternatively, Motion Pro makes a specific tool for lubricating cables which makes the process a tad easier.
Ready To Ride
Checking the free play, slack, or tension on your cable-actuated clutch is the best way to ensure you’ll get the best performance. A clutch that’s being regularly checked and maintained will treat you right, providing thousands of miles until the clutch pack needs to be replaced entirely. So, mind that free play, slack, or whatever tickles your fancy, and get out on a ride! Do you have any more helpful content suggestions? Drop them in the comments section below.
Become a Motorcycle.com insider. Get the latest motorcycle news first by subscribing to our newsletter here.
More by Edward Narraca


Comments
Join the conversation