


The 390 Adventure Project – Upgrades and Adjustments


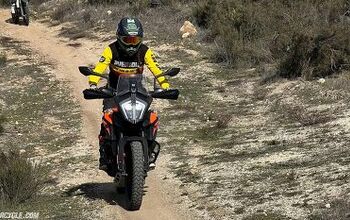
Following in the wake of the Biltwell 100 race, my confidence in the 390 Adventure and my ability to pilot it for long stretches off-road soared. The ability to combine the technical skills I learned in the ATX Moto Adventures and Sedlak Off Road classes, along with some good old-fashioned seat time, really paid off. In addition, there were two changes I made to the bike that firmly cemented my trust in piloting it through the sketchy sandy trails – a custom lowered seat from Seat Concepts, and some aggressive knobby tires. A few additional upgrades came about as a surprise as well, helping toward the goal of taking this bike on a camping trip or two as I prepare for a full BDR trek.
Read More:
Seat Concepts Seat

Currently there are no OEM or aftermarket companies who make a ready-to-go lowered seat for the KTM 390 Adventure. KTM offers a “tall” rally-style single seat option, in replacement of the stock two-part saddle seat, which is a little narrower but three quarters of an inch higher than the stock seat. Likewise, Seat Concepts offers a re-cover kit with a ‘comfort’ option at exactly stock height for the two-part seat as well as a ‘sport touring’ kit that is half an inch taller than stock.
I decided to reach out to Seat Concepts to see if the team there would consider cutting down and reshaping the one-piece rally-style PowerParts seat that I had picked up from KTM. After some back and forth to discern my goals, the folks at Seat Concepts agreed to give it a shot. I mailed the seat up to the headquarters in Idaho, and after about a week, the updated seat returned back to me in southern California. My goal was to get the front of the seat narrowed as much as possible, while also reducing the overall height in the front portion. As I told Seat Concepts in our emails, comfort wasn’t a huge factor, and I was willing to sacrifice that in order to get more boot on the ground.

The end result is a seat that maintains the same lines as the original “tall” OEM rally seat, but is substantially narrowed at the front. I was able to go from a single tip-toe on one side, to about three quarters of my foot on the ground with the reshaped seat. Official seat height at the lowest point is approximately 31.9 inches, which is just about 1.7 inches lower than stock. While I can’t get both feet down at the same time, this is a huge improvement and I am thrilled with the results. Hopefully this demonstration will spur a ‘low’ option from Seat Concepts for the 390 Adventure, as I feel it would make a huge difference to new and inseam challenged riders.
Think you would be interested in a low seat option for your KTM 390 Adv? Let Seat Concepts know here.
Knobby Tires
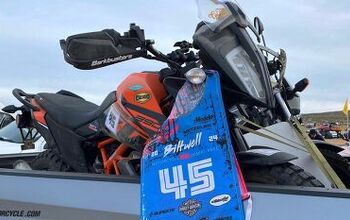
Procuring appropriately knobby tires proved to be a bit of a thorn in my side before the Biltwell 100 commenced. After a few false starts with backordered tires, delayed deliveries, and misjudged fender clearances, I finally found two tires that not only functioned beautifully, but were relatively inexpensive and, most importantly, actually available.

The bike arrives from the factory with Continental TKC 70’s fitted, and while they are geared towards the street side of adventure touring, they did fine during the off-road training classes I attended in all sorts of situations. That said, I knew I wanted to get as much help as possible for the sandy Biltwell 100 course, so I aimed to go as aggressive with the tread as possible while maintaining a DOT status. After a shipping delay on one option, I was able to source a Motoz Tractionator DualVenture from a local spot at the very last minute. The tire, a “part desert race tire, part long distance adventure touring tire,” which seemed a little too good to be true, but ultimately proved to be the right tool for the job. The new front tire gave me much more confidence in the sand, providing great grip and not pushing as much in turns compared to the stock tire. The 70/30 Motoz tire, while said to be built for longevity on cross country adventure riding, ate up any loose rocky hill climb I encountered, and by the second lap, I was confidently slicing through the deeper sandy parts with ease, too.

Shinko is another solid bet when it comes to off-road tire offerings, and although the 805 Big Block Adventure was not my first choice, it was the one that was in stock when I needed to replace the TKC 70 rear. A 60/40 tire made in a classic ‘Big Block’ pattern, this 130/80-17 chunky rear tire got the job done. While I may have preferred something more aggressive, the 805 handled the climbs and loose uphills well, and even helped me claw my way back to stable ground when I found myself tits up on the ‘hard route’ hillclimb. Overall, I am happy with the choice, and am looking forward to seeing what kind of wear I get with the rest of my summer riding plans.
Post race, with the goal of some longer distance BDR style riding in mind, I feel confident that the MotoZ DualVenture and Shinko can hold up for both on-road and off-road mileage for at least this summer. In the future, I plan to get my hands on a set of the new Conti TKC 80’s to see how they compare to my experience with the TKC 70’s and this mix match of Motoz/Shinko.
T-Rex Racing Handguards

Another “can’t live without it” addition that I made was one of necessity, replacing the plastic KTM handguards with something more protective and hardy. After a few low-to-no-speed tipovers, the stock guards had cracked completely off on the left side, leaving my clutch lever exposed and open to even more damage. I found the T-Rex Racing Handguards and easily had them swapped on in no time. The aircraft grade aluminum is sturdy and powder coated to prevent corrosion, the stainless screws and plastic Bark Buster wind guards all fit together perfectly, and with the help of the installation video on the purchase page, it might have been the easiest install I’ve ever done. I appreciate that the plastic guards can be replaced as they slowly get destroyed, and even after landing on them half a dozen times during the race, they never once budged out of place. The right side guard comes up and over the brake fluid reservoir, protecting it from any over enthusiastic throttle side mishaps and there is plenty of clearance for the levers to move inside the guard.
ABS/MTC Dongle
In my research to solve the very few challenges I have with the KTM 390 ADV, I have been on the hunt for something that can save the MTC setting in the ‘Off’ mode semi-permanently. The MTC or Motorcycle Traction Control is a separate setting from the ABS system, and both offer different modes from the option menu. In order to turn off the MTC, you need to cycle through to the correct menu and press and hold the ‘select’ button for about eight seconds while the motorcycle is running and the throttle is closed. If the bike turns off, be it from the kill switch, keying off, or stalling the engine, the MTC resets automatically. Now, that may seem fairly simple, but doing so while attempting to recover on the side of a hill, or any other offroad situation where you may have less traction and even less foot on the ground, makes it frustrating and time consuming – and potentially dangerous. For other KTM models, like the 690 Enduro R and the 1290 Adventure, there is a Powerpart dongle that is programmed to let you override the ABS/MTC default settings menu and let you save your preferred settings, even when the bike is fully switched off. So far, it appears that there is no similar option for the 390 Adventure, and the only possible workaround may be removing the ABS sensor from the rear wheel.
Moving forward
My next additions to the bike post-race are ones with long distance touring in mind. First on the list was adding risers to the handlebar to correct my standing position. I paid a visit to Rottweiler Performance in Costa Mesa to see what options were available, and I was surprised to receive a few upgrades that weren’t on my original task list.
Rottweiler Performance Bar Risers

These universal 1-inch risers are made of aluminum and offer two bolt holes for attachment to nearly any type of bar situation. The 390 ADV only utilized one of the bolt holes, as the KTM bar clamps are held with a single bolt. As such, we were able to shift the bars into a slightly more forward position. While we did need to relocate the clutch and brake cables to the rear of the triple clamp, it was overall a simple process to get everything swapped. The difference this made in my standing riding position was immediate and I was kicking myself for not searching these out sooner. Even with just raising the bar an inch and rotating it and the levers back a smidge, I was almost completely upright while standing and felt like there was much more room for movement in general. I can’t wait to see how much of a difference this makes on the trails.
Rottweiler Dash Protection

This was one of the “surprise” upgrades I didn’t know I desperately needed until I saw what a difference it made. Earlier this spring I had taken the 390 on a dusty trail through Anza Borrego and at some point had swiped the dust off the TFT with my gloved hand. I immediately regretted the action, as I had just etched a permanent spirograph into the plastic, and no amount of cleaner and microfiber cloth was going to remove it. When I keyed on the dash to check the mileage at Rottweiler, Chris immediately said, “we can fix that” and procured one of the clear Dash Protection Films from his stockroom.
Installation was as simple as cleaning the dash with Windex, re-spraying both the dash and the film with Windex, and after carefully placing the film on the TFT, squeezing out the excess fluid to bind the film to the screen. Almost immediately the deep scratches in the screen melted into nothing, and although it was initially a little foggy, the screen cleared completely within a few days. I’ll let the pictures do the heavy lifting here:

Rear Master Cylinder Guard and Luggage Plates

My goals moving forward with this bike are all trip and trail related, and with the peak of summer coming up quickly, I am looking into how to best equip this bike with all of the camping gear I may need for a trip up the coast. Adding the Rear Master Cylinder Guard offers not only the extra protection for the master cylinder, but includes solid mounting points for any rackless luggage system that I might install to hold my camping gear. As you can see in the photo, the guard wraps around and shields the reservoir from any potential damage, and based on my current skill set, I am more than thankful for any preventative measures I can put in place.

We also added the Luggage Strap Plates to the passenger pegs for an alternate mounting point for luggage tie downs. The stock pegs had a space to hook a bag, but the potential to break a plastic part is always a concern when riding offroad, and swapping for these sturdy aluminum plates was a no-brainer. I’m very excited to get some bags and put them to use!
Rottweiler Power Plate

This little gem is brand new to the Rottweiler lineup of KTM upgrades and I was thrilled to be one of the first to test it out on the 390 Adventure. The Power Plate is a high-flow airbox lid with a replaceable and cleanable filter system. According to Rottweiler’s in-house dyno, it adds two horsepower to the engine without needing any sort of reprogramming.

I was skeptical about being able to physically feel a difference in the bike, but not only could I feel a difference, even in first gear, I could hear a difference as I pulled the throttle. The slightly raw deeper intake howl added to the otherwise tame sound of the stock pipe and matched the uptick in power that I could feel at the rear wheel. It even made tootling around the beach in low gears an absolute delight. I’m curious to see if this will help in lower gears on slower, technical off-road terrain as well.
Time to hit the trails!
Overall, I’m very happy with what I’ve been able to find and upgrade for the 390 Adventure, and even more thrilled that every step I’ve taken so far is making a huge difference in my confidence on the bike. I am currently planning a few short moto camping trips and trail rides and aiming to work my way up to a BDR this Fall. If there is anything that you would like to see, either as a KTM 390 Adventure owner or beginner ADV rider, please drop it in the comments!
Become a Motorcycle.com insider. Get the latest motorcycle news first by subscribing to our newsletter here.
Cait is a motorcycle enthusiast first and foremost, often spending weeks at a time crisscrossing the country on her Moto Guzzi V7. She got her start in the industry running a women’s moto gear market that travelled the country, and has been able to see the women’s moto community grow from the inside out over the last 10 years. She is typically found on pavement but has been eagerly diving outside her riding comfort zone for the sake of a good story, previously riding her TW200 through two Biltwell 100 races and one very well intentioned LAB2V. While not glued to her motorcycle, Cait lives a secret life as a hairdresser and quilter.
More by Cait Maher


Comments
Join the conversation
I’ve loved following along on this. You absolutely crushed it at Biltwell and it’s great to see how well you have slowly molded the 390 platform into what it really should have been from the beginning!
Have you considered raised riding boots like the Daytona LadyStar GTX?